 |


THE COMPLETE SOLUTION

Choose one of the chapters:
Note: exact positions are described in square brakets like this: [3,15].
You can see your exact position in detailed map in the game.
In Dunghill
- Get work from Myron [9,12]. He'll give you a key. Open the garden gate at [7,14].
- Take two chickens at [4,15], [8,16].
- Kill the giant worm in the garden and go back to Myron for reward.
- Give 5 coins to beggar. He'll give you a rusty key. Unlock the door to townhall cellar at [13,11].
- Go to the townhall cellar.
- Pull the levers at [12,6] and [13,8].
- Take the chickens at [12,9] and [9,6] and [11,11].
- Go to the pub's cellar. Ladder down is behind the foliage east from the pub's door.
- Take the chicken at [1,10].
- Go back to the surface. Bring all the six chickens to Mathylde at [8,6].
- Defeat Ukmar at [1,7], if you want some extra money.

Outside Dunghill
- Talk to the woman at [3,4].
- Get to the cottage at [22,18] and enter the door.
- Talk to the man at [31,1].
- Get a job (and list) from the merchant at [45,12].
- Talk to the woman at [47,10].
- Talk to the hunter at [41,9]. He'll give you a bloody meat.
- Kill the demon at [42,18].
- Defeat the dog at [28,4] (you need the bloody meat here) and go to the hunter for reward.
- Enter the ancient tomb at [32,1].

The ancient tomb
- Get one bone key in sarcophagus [3,14].
- Find button at [12,16] and open a secret passage.
- Save the lost brother at [23,5]. He'll give you another bone key.
- Find the button at [7,1].
- Press all levers you encounter until you make your way to the last chamber [5,9].
- Use the bone keys to unlock two locks on the walls.
- Take the poster at [2,10]. You got a proof of heroism now.
- With the proof go back to Nimlor and talk to the watch at [45,7]. Answer "adventurer" and give him the proof.
- Leave the village to the east.
- Go to the summoner's cottage at [7,31] and take the job he is offering. He'll give you an empty flagon.
- Free the fairy at [13,35] to get a power gem. She's guarded by horde of spiders.
- Get to the woman at [6,41]. Prepare for battle, if you agree to follow her.
- Get 6 wolf furs to the gypsy at [1,23].
- Give a bread and a cheese to the statue at [4,22].
- Talk to monks in the temple at [5,18] and take another work. They'll give you a holy water.
- Go down into the lava pit at [11,22].
- Find the ruby at [7,9].
- Find and step into four glowing circles on the ground. They are at [1,14], [5,8], [13,4], [13,13].
- After destruction of the fourth circle, the fire lord appears near the exit. Kill him and get the second ruby.
- Put the two ruby stones into the skull at [5,8].
- Go through the bush at [5,13] and find a troll cave entrance.
- Find the runic stones at [13,14] to repair the broken teleport obelisk.
- In the troll cave fill the flagon with water at [5,2] and bring it back to the summoner.
- Find the woodcutters' cottage at [15,35]. Get wolf-killing job from them.
- Ron will appear at [13,35]. He'll take you to a hidden clearance. Kill all wolves there and go back with Ron to collect your reward.
- Find a village. Talk to Edwin at [23,25].
- Talk to the highlander at [34,26].
- Talk to the troll at [34,22] and get a forest spell of passage.
- Talk to the guard at [37,30].
- Talk to Ogla the druid at [24,37].
- Go to the Ogla's Maze.

Solving the Ogla's Maze
Follow this sequence through the maze
(L=turn left, R=turn right, F=move forward, P=push boulder)
Starting position: [27,43], facing south.
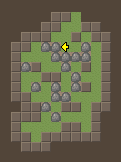
LFRPF LPFLP FRFRP
FPFPF RFPFR PFLPF
RPFLP FRPFL PFLPF
go to [23,44] and turn to south,
PFPFL FRPFL FPRFP
FPLFL PFRPF PFPF
go to [28,50] and kill the troll,
FPFLF RPFPF
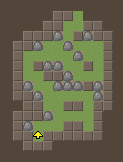
take ogla's herbs at [24,52].
|
|
Maze in the beginning:

|
Maze, when you reach the herbs:

|

- Give the ogla's herbs to Edwin.
- Then tap on the Aenor's statue at [27,29] and take the spring stone.
- Tap on thewell at [29,32] and take the stone crook.
- Give a bottle of orkish brandy to the beggar at [31,32].
- Use the stone crook on the monk's statue at [2,26].
- Go to the wolf's lair at [8,27].
- Use the secret passage to the east at [7,2] and get the icebear bow there.
Bring it back to the sad archer in the village at [34,26]. Enter the mines at [11,19].

In the mines
- Repair the teleport obelisk at [2,21].
- Go to [24,21]. Here is a rebus with levers. Pull the levers at [22,19], [23,21] and [27,21].
- Take the miner's key on [28,18].
- Use the key at [4,6]. There's a pick behind the door and you'll be able to get gold out of a rock with it.
- Find the exit at [22,44].

Back on surface
- Go to [30,3] to recharge the spring stone.
- Go to [26,5] and tap the avalanche there. Then recharge the stone again.
- Talk to captain Roland in his tent at [37,6].
- Melt another avalanche at [29,9].
- Use the secret passage [29,11], follow the path and go through the rock at [39,20].
- Go back to the village and talk to the guard at [37,30], open the gate and leave the village.
| PART 4 - ABANDONED GRAVEYARD |
- Go to the gravedigger's cottage at [5,3]. Talk to the gravedigger.
- Go to [10,3], unlock the door and enter the cellar.
- Kill all the rats here. Take two iron keys in the chest at [1,4]. There's a hidden lever at [5,1].
- Talk to the gravedigger.
- Open the gate at [9,13] and loot the tomb behind it.
- Open the gate at [16,13] with the second key.
- Go to the tomb of Vigus at [20,12].
- Pull levers at [4,12], [6,12], [12,12].
- Get the first seal quarter in the sarcophagus at [8,19].
- Find Leonard at [21,26] and get another job. You must find him 5 bodyparts.
Their locations: [14,5], [36,19], grave at [12,8], grave at [7,15], small tomb at [12,3].
After finishing the job, choose freely if you kill Leonard or his creation.

Tomb of Ambrius
- Enter the tomb of Ambrius at [20,14].
- Get the tomb key at [11,1].
- Enter the teleport at [1,3], empty the chest and tap the torch to teleport out.
- Get the chateau de carcass at [11,10].
- Get the second tomb key in sarcophagus at [5,16].
- Go to the lower level and use the both keys on locks to get to the treasure.
- Go back to the gravedigger.

Catacombs
- Go to the catacombs at [30,13].
- Go down at [11,12].
- Find the exit up at [15,6].
- Get a gear in the chest at [27,9].
- Remove the timber blocking the door at [22,7], then free the door at [13,8].
- Go down at [12,4].
- On the lower level find a chamber with a lot of remains lying on the ground in blood stains.
- Don't step on remains. Find a way across the chamber to the lever at [3,3] and pull it.
- Then pull the lever at [3,7].
- Get to the sarcophagus at [2,5] and empty it. Now you have the second part of the seal.
- Go up.
- Go to the chamber at [15,2], crack the wall at [17,2] and get the second gear from the chest at [20,1].
- Use both gears on the lever at [20,9].
- Find the exit up at [17,15] - you are back on the graveyard.
- Remove timbers from the gates at [33,10] and [33,16].
- Break the vase at [35,6] and get the rusty key.
- Get the tools at [37,7]. Kill all the zombies that emerge, and then tap the coffins in the corner. Gravedigging job is done.
- Open the gate at [9,25], enter the tomb at [13,25], kill Mad Edward there and get the ancient necklace.
- Take the necklace to the zombie at [37,20]. She'll give you a golden key.
- Use the key on the gate at [20,21] to get some nice treasure.
- Go to the gravedigger. He'll give you the third part of the seal.

- Go to the catacombs again.
- You can trade with the goblin at [40,4], if you give him a rat meat or a chicken leg.
- Find the exit down at [45,14] behind an illusian wall.
- On the lower level find the teleport maze at [3,24].
- Clue for the maze: green grass means: go north, white flower means: go east, red flower means: go south, yellow flower means: go west.
The correct sequence of steps is (letter mean directions):
EEES - SSWW - SSEE - EESS - WWW (teleported) W -
WWW (in the center) N -
NNNE - EESS (teleported) - SSEE - N
- Find the exit up at [12,20].
- Go to the chest at [46,4]. Close the doors to the west, north and east before you open the chest.
- Take fourth part of the seal from the chest.
- Open the three doors one at a time, kill the undead and pull the levers to open the main door to the south.
- Go to the graveyard to the royal tomb at [26,26].
- Tap the round stone blocking the entrance and enter the tomb.

The royal tomb
- Press the button at [28,7] and get ruby at [25,7].
- Press the button at [13,19] and kill the skeleton to get the second ruby.
- Use the both rubies on the skull at [22,13]. Use the teleport to enter a secret chamber.
- The button at [28,7] opens an entrance to another secret area.
- Drag an enemy to the plate at [22,8] to open the secret area to the north.
- How to pass the Chamber of sun: start on the position at [24,20], then move to the following direstions: EESS WWWW SSEE.
- Behind the chamber find the stairs down. On the lower level go south, until you find another stairs down.

- Go to [8,7].
- Read the book to the east until you rip a paper with runes out of it.
- Use the stairs up at [4,2].
- Find the flute at [12,6]. (You have to break a cracked wall to get there.)
- Take the items from sarcophagus at [2,9].
- Put the severed skull on the pedestal at [2,12].
- Put the sandals on the pedestal at [1,7].
- Put the left hand on the pedestal at [2,5].
- Put the right hand on the pedestal at [3,7].

- Go down and then use the stairs up at [8,14].
- Go to [17,29]. You are in a chamber with a lot of cracked walls around. Break them all and find 8 levers. Pull them to open the door on the west.
- Go through illusional wall at [13,28] and press button at [12,22].
- Get to the painted wall at [2,17].
- Use the paper with runes on it and tap it again.
- Correct answer is "nis" and "oghal".
- Go to [29,25] and tap the torch. Then cross the water.
- Open the sarcophagus at [35,28] and kill the stone golem.
- Go to [34,11]. (Beware of the turning teleports at [26,12] and [36,12].)
- Press the button and then again the button at [34,13].
- Break the wall at [30,11] and use the flute on the sign behind it.
- To leave the chamber press the button at [30,13] and enter the teleport.
- Now you can use the teleport on the lower level at [8,6] to enter the king's chamber.
- Talk to the king and then return to the graveyard.
- Talk to the king again at [27,21].
- Leave the graveyard through the hole at [28,20].
- Pass the spider tunnel (altar of restoration is at [16,16]).
In the cloister:
- Go to [38,9] and talk to a hangman.
- Find a fat dead to the north from there and kill it. Talk again with the hangman.
- Go to a prior's cell and tap the book at [20,12]. (You can see it only, when you are facing north). You'll get a tower key.
- Find the clapper at [3,4].
- Unlock the tower at [8,6].
- Climb up the tower and use the clapper on the bell at [12,2]. Ring the bell 12 times.
- Find a prior's key in the chest at [14,0].
- Back to the cloister...
- The prior's key fits to the door at [9,13].
- Go to library. The entrance is at [28,1].

In library
- Find the book at [6,10]. Tap it and read it.
- Tap the geen book at [1,16] and take the sprig.
- Tap the red book at [1,13] and take the scale.
- Tap the blue book at [1,11] and take the pearl.
- Use the lever at [4,19].
- Fill the hole at [3,22] in this order: scale, sprig, pearl. You'll open the secret area at [2,20].
To explore the whole library, you can follow this sequence of actions (there is more that one way through):
|
Tap the lever [10,17],
Take the ruby [13,16],
Tap the book on the ground at [14,17],
Teleport [16,21],
Button [12,15],
Lever [14,13],
Book in the shelf [13,13],
Book [12,11],
Button at [16,10],
Teleport [16,8],
Button [6,15],
Button [3,12],
Button [3,10],
Lever [8,10],
Lever [9,8],
Teleport [15,4],
Button [11,1],
Teleport [12,1],
Teleport [13,5],
Teleport [16,2],
Lever [12,5],
Take the ruby [9,4],
Teleport [16,8],
Book [5,7],
Teleport [7,7],
Teleport [6,4],
Lever [2,7],
Put the rubies in the skull at [3,3],
|
- Leave the library and go to the temple to the statue at [37,7].
- Tap the statue, until it's heading to the south. Then the wall at [36,6] will open. Follow the way down.

In the cloister underground
- Talk to the monk at [17,7].
- Take the iron key at [14,1].
- Tap the button at [10,1] and press the plate at [9,2].
- Tap the torch at [4,3] to open the door at [3,1].
- Use one iron key on the door at [8,9].
- Use the stairs down at [8,10].

- Go to [3,7] and fall down.
- Pull the lever at [32,4].
- Open the door at [31,3] and the door at [34,4]. Use the stairs at [32,7].
- Survive the interrogation and fight the way to the warder staying at [18,8] (or somewhere near). Kill him and take his two keys.
- Open the armory at [23,6] and take the viper staff.
- Go upstairs and give the viper staff to the monk at [17,7]. Then kill the monk.
- On the second level, save people in the northwest corner. Talk to all 4 of them.
- Use the ladder at [19,22] to go up. Take the bone key at [1,5] and go down again.
- You can find another iron key at [18,10] of the cloister cellar and use it on door at [13,11].
- Go down to cloister underground and unlock the door at [25,20].
- Fight your way through to the exit at [28,16].
- Go to [4,4].
- Kill everybody. The priest master will drop a key. Use it at [6,2] and leave the cloister.
The city offers many quest and you will meet many enemies with different difficulty.
I will describe the solution for the quests separately, but the order of solving
them depends on you. If you encounter a quest too tough for you, continue with another one
and go back later, when you got better stuff and experience.
Ghouls in the sewers
Talk to the sewage worker at [22,24]. He'll give you a manhole key,
which you need to enter the city sewers. Kill 10 ghouls and bring their eyes as a proot to the sewage worker.

Missing boy
Offer help to the woman at [18,20]. Kill spiders in the city park and reach [3,30].
Then go back to the woman. You can get to the park through city sewers,
but first you need to complete the quest adventurer and open the main tank.
To survive this you have to drain the water form it by turning the wheel at [7,14],
[32,14] and a hidden one at [16,5].
There's a button at [18,7] - click it and all the others you find there to get to the hidden wheel.

Alchemist
Offer help to the alchemist at [48,27]. Unlock the door at [47,26].
Inside the house go to the cellar and kill the demon. Then talk to the alchemist again.

Adventurer
Talk to the apple merchant at [23,5]. Go to the Mad Dwarf's pub at [51,25]
and find Rimbrock. Kill him and take his axe. Give the axe to the apple merchant.
If you want to solve the paying debts quest, then go to the Duncan's Axes
shop at [30,26] first, and show the axe there before you give it to the merchant.
The apple merchant will disappear and clear the way to the very important sewer hatch.

Paying debts
Go to the Duncan's Axes shop at [30,26] and ask Duncan, why is he in a bad mood.
Talk to the apple merchant at [23,5] to locate Rimbrock. Go to the Mad Dwarf's
pub at [51,25] and find Rimbrock. Kill him and take his axe.
Then go to the Duncan's Axes shop at [30,26] and show the axe there.

Befert hermit
Read the note column at [36,26] until you find a message from a Hermit's Eden.
Give money to the beggar at [52,29]. Open the door at [54,31]. Kill the thugs and go inside.
You will find crates with some ware in there. Then go to the Hermit's Eden at [19,20] to get the reward.

Princess
Read the note column at [36,26] until you read a message from Lady Elbrunda.
Go to the sewers. The missing dog is at [24,24]. Knock at the door at [29,17] and collect the reward.

Retired gladiator
Talk to Razzik at [52,22]. Talk to Khumrac at [42,13]. Kill everything in the arena.
You have to ring the bell to start a next round and you must kill all the creatures in the round.
There are four rounds. Then ask for reward (choice is yours) and then talk to Razzik again.

Smugglers
Find merchants in Jolly Goose Tavern at [35,2]. Knock at the door at [28,9]
and offer your services to the smugglers. Do four jobs for them to finish the quest and the game.

Ransom
First job for the smugglers: Knock on five doors in the city to collect ransom money.
In the city zoo you will be attacked by animals, and in the warehouse in the port
you will be lured inside and attacked by some roughnecks. Kill their boss to get
the money you came for. The doors you need to visit are on these locationes:
[23,2], [17,25], [47,33], [49,11], [47,7].

Tournament
Second job for the smugglers: Go to the sewers, kill two other parties
and get their rings. You will find the team of assassins at [35,16]
- Shadow cloak bears the ring. The team of lizardmen is at [3,24]
and ring is held by Krissrak. Lizardmen are behind the main tank. See quest missing boy
to find, how to get there.

Competition
Third job for smugglers: Get in the house through window at [32,27].
Get in the cellar. Kill executioners to get keys to locked doors. Find the keg at [23,14].
Use it on the door at [17,6]. Go to [17,13].

New warehouse
Fourth job for smugglers: To do this you have to drive evil ghost of duke Falstad
out of the cursed house. The house is at [23,31]. Follow the description in the house of horror quest.

House of horror
After recieving the fourth job from smugglers enter the house at [23,31]. Go to [2,8]. Follow the description in the magic mirror quest.

Magic mirror
Go to the city and to the alchemist's house at [47,26]. You need the quest alchemist to be completed
to get some answers from the man. Tell him about the mirror.

Seeker
Complete the magic mirror quest. Buy a black cat at the Zephran's Menagerie at [49,21].
Go to the tree at[24,10] and get the cottage key from the hole. Go to the city park
to the cottage at [10,29], unlock the door and go through the cottage to the
garden. Kill man-eating plant and take it's root. With the cat and the root
go back to the alchemist.

Magic circle
Complete the seeker quest. Go to the cursed house and walk through the mirror at [2,8].
Walk through the mirror at [8,13]. Take the golden key in the room. Find the stairs up
at [10,8]. Upstairs unlock the door at [4,10] and in the dark area light up all
the candles. Wraiths are destructible in the light. The candles are at [8,10],
[6,4], [11,4], [15,4], [18,4], [18,15], [13,15], [6,15], [11,10] and [15,10].
When the whole area is lighten up you can find the shards at [13,8]. Take it
downstairs and fix the mirror at [8,15]. Go through it and then through the
mirror at [6,19]. Read the book at [19,5]. Go to [4,3] and find the dungeon key
in the blue book in the bookshelf to the east. Go down the stairs to the dungeon.
Unlock the door at [11,9]. Go to [17,9]. Go to the city and talk with the alchemist.

Blood link
Complete the magic circle quest. Go back to the cursed house and it's dungeon.
Go to [17,9]. Go to [14,6]. Go to [14,14]. Go to [9,16]. Go to [3,9]. Go to [4,4].
Tap the crack in the northern wall. Go to [2,2], tap the bones and talk to
the necromancer's ghost. You will find a key there. You can use it on the lock at [15,6].

Duke of horror
Complete the blood link quest. Go to the cursed house to the study room at [18,5].
Click the painting at [19,4]. Walk through the picture to the astral plane.

Killing immortal
Complete the duke of horror quest. On the astral plane destroy all the glowing crystal.
Their locations: [1,4], [15,3], [8,10], [17,12], [3,15], [3,21], [10,18], [9,22],
[17,27]. You will need two keys to get everywhere on the astral plane.
One lies at [1,27], the second one is at [1,1]. After finishing the crystals
go to [13,12] and kill the monster. Go to the smuggler's HQ to finish the game.

|
 |
|


